
Gain access to personalized product screening, the best pricing, rewards, and more!
Create An Account, Or Sign In.
Most Effective Products
How to Calibrate a Pesticide Sprayer
In order to prevent under or over application of a pesticide product to your lawn it is a good idea to calibrate your sprayer whether it is old or new. Preparing your pesticide sprayer before you begin will help to save time and reduce wasted products on the first try.
For maximum sprayer accuracy, it is best to calibrate at the beginning of the season and throughout the season. There are different sprayer types you can use, but the models we recommend are a handheld pump sprayer, backpack sprayer, or hose-end sprayer. Depending on the method you choose, and the sprayer type you are using, the way you calibrate the sprayer can vary.
The main goal for calibrating your pesticide sprayer is to determine the amount of spray solution being used per gallon per acre or square footage. Then to make adjustments if needed based on the recommended rate according to the pesticide product label.
By following this DIY guide you can learn how to properly calibrate your pesticide sprayer. If you have any questions after reading this article please call, email, or contact one of our stores and we can help you out.
Tools Needed

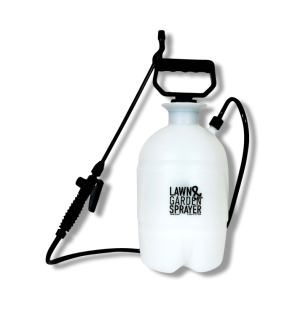
Sprayer:
- Handheld pump sprayer- ideal for spot applications or easy control during application.
- Backpack Sprayer- good for spot and broadcast applications.
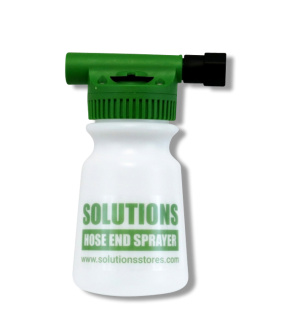
- Hose-End Sprayer-commonly used more for large scale broadcast applications.
Personal Protection Equipment (PPE):
- Safety goggles or face shield.
- Mask.
- Chemical resistant gloves.
- Apron, coveralls, or Tyvek Suit.
- Long-sleeve shirt.
- Long-sleeve pants.
- Closed-toe shoes with socks.
Other Equipment:
- Pre-emergent or post-emergent pesticide.
- Scale or measuring cup.
- Timer.
- Tape Measurer.
- Calculator.
- Landscape paint or marking flags to mark off treatment and testing area.
You will also need a paved off area to perform test sprays to measure your pesticide sprayer broadcast swath. Testing on a solid surface will allow you to see how the product falls and the range of spray when the product exits from your sprayer. This allows for easier clean up and spares your turf from being damaged by testing pesticide on it.
How to Calibrate Your Pesticide Sprayer
Step 1: Inspect Sprayer Equipment

Fill your sprayer halfway with water and gently press the trigger until a gentle coarse of water is released from the sprayer. As your running the sprayer inspect it for leaks and to ensure that all parts of your equipment are working accurately.
Remember, you are just testing the product at this point and should not add any pesticide, herbicides, or chemical products to reduce waist.
Step 2: Select Your Nozzle Size

The spacing between the nozzle and the sprayer will determine the type of nozzle to be used. To find this, you will measure the distance in inches between the nozzles. To do this, you will take a flexible measuring tape and place it at the end of wand where the nozzle is all the way to where the wand connects with the sprayer.
Typically, you will use a nozzle size of 20 inches, which will cover a travel distance of 204 feet.
Spacing between the nozzles indicates the following: 10-inch spacing for a travel distance of 408 ft. For a 15-inch spacing, it will cover a travel distance of 272 ft. For a 16-inch spacing it will cover a travel distance of 255 ft. For a 18-inch spacing it will cover a travel distance of 227 ft. For a 22-inch spacing it will cover a travel distance of 185 ft. For a 24-inch spacing it will cover a travel distance of 170 ft. A 30-inch spacing will cover a travel distance of 136 ft. For a 40-inch spacing it will cover a travel distance of 102 ft.
Step 3: Set Height of Sprayer

This part is simple, because you have already done this in the previous step. The height is the same as the nozzle spacing.
For example: 20-inch height = 20-inch nozzle spacing. A 30-inch height = 30-inch nozzle spacing.
Remember, when you are spraying a product above a plant you do not want to adjust the height any higher than the nozzle spacing to avoid drift. When you are spraying a dense foliage try to spray the area above the foliage and not directly towards the ground.
An instance of where you may not follow this is when you dealing with a harmful non-selective pesticide. You will want to directly apply a spot application onto the target foliage to avoid spraying desired plants.
Step 4: Measure out a Test Area and Time Application

Measure out and mark off a paved area on your property with the help of your measuring instrument. You will want to measure a test course that corresponds to the distance between your nozzles.
If your treating an area that exceeds the distance of your nozzle then test an area of at least 1,000 sq. ft. You will want to use this size since most yards or homes contain at least a 1000 sq. ft.
To find this, measure and multiply the area length times the width in feet until the square footage is 1,000 sq. ft. and mark off this area with the help of a marking tool like washable paint or objects like safety cones, to mark the border outline.
At a normal pace, walk or drive at your normal spraying speed through your test area and record how long it took you to travel in seconds. Repeat this procedure one more time and average the two measurements. Hold onto this information for the next step.
Step 5: Calculate Desired Nozzle Output

Place the end of your sprayer wand or tip into a large measuring container that can measure in either ounces or gallons.
Now spray water into the measuring cup for how long it took you to walk or drive your marked distance. Example, if it took you 2 minutes to travel your treated area while spraying then you will catch 2 minutes of output (water in this case) from the sprayer.
For a standard backpack or handpump sprayer, you take your average two measurements from step 4 and see if the rate differs more than 10%. If so, then you will need to adjust the pressure of the sprayer and possibly replace or clean the nozzles.
Lowering the spray pressure will reduce the amount of product applied and a higher spray pressure will increase the amount of product delivered.
Step 6: How Much Product to Use and Making Adjustments if Needed

The amount of ounces captured per nozzle output is how many gallons per acre that will be applied. For example, if you have 46 fl. oz. then you will apply 46 gallons per acre.
To determine how many gallons per 1,000 sq. ft., then divide gallons per acre by 43.56. Typically, 1 gallon of water or product will cover a 1,000 sq. ft.
The application rate should be within 10% of the recommended product application rate. If the actual rate of the product is more than 10%, you will have to make adjustments in the spray pressure or travel speed, or possibly with both. As previously mentioned in step 5, you can adjust the application rate by lowering or increasing the spray pressure.
If these changes do not improve the recommended application rate, then you may have to select a different nozzle. Repeat the previous steps if not within the recommended application rate.
Things to Consider
- When calibrating your sprayer, make sure to test with water first before using product. Once your calibrations are set within the recommended range then load your product into the tank.
- Multiple recalibrations may be needed with the sprayer until you achieved the recommended application rate per the product label.
- Before testing on porous surfaces such as cement make sure the product is non-staining. Pesticides containing significant amounts of iron can possibly stain your driveway or sidewalk.
Key Takeaways
How to Calibrate Sprayers for Pesticides or Herbicides?
- To set a sprayer for a pesticide or herbicide application you will have to measure the size of the treatment area and the distance between the nozzles. Once you have these measurements then you know how many gallons per acre will be applied. The gallons per acre should match within 10% of recommended rate of the product label.
What is the Formula for a General Sprayer Calibrations?
- To find the gallons per acre use the example formula. For example, Gallons per acre = gallons per acre (gpa) X miles per hour (mph) X nozzle spacing (w) / 5,940.
- However, you can also spray into a measuring cup for as long as it took you to travel the size of the treatment area or spray distance associated with your nozzle spacing. If you walked 45 seconds within the size of your treatment area then spray for 45 seconds into measuring cup. The gallons per acre will be however much is sprayed into measuring cup within that time frame.